Hi Y'all!
IT'S THE MOST WONDERFUL TIME OF THE YEAR!
Sorry, I needed to get that out. Christmas is my favorite holiday and I'm just so excited to officially get into the holiday spirit!
**Though I was compensated for this post in product and/or monetarily, all opinions, ideas and comments are 100% my own. Please note: this post may also contain affiliate links.**
 |
| (Affiliate) |
Here are some of the gifts I made with MY Cricut Air 2. They're SO easy to make, and so unbelievably cute!
My Wunkie princess (that's my daughter's nickname if you're new to these parts), just LOVES art and painting. She is quite the budding artist. I post her sketches and paintings quite often on Insta so you will have to go check them out there! If you have been on my corner of the internet before, you may know that her room is purple and teal! She needed a special place to hold all of her artists brushes so I decided to make her a brush holder!
All you need to do this is a Dollar Tree votive holder, some Darice Fine Glitter in Purple and Luminous, some Mod Podge. and your favorite quote! I used a Van Gogh quote since Wunkie loves his work. It reads, "Art brings imagination to life."
Using a brush, Mod Podge the inside of the votive holder, then quickly add the glitter, turning the glass so it evenly coats all of the cup. To do two colors, you must coat each layer separately and wait until the first layer is dry to apply the second one. Some people actually use a glaze coat inside once it's glittered and dry but I just sealed the glitter with a spray lacquer.
For the quote, I used a font that I bought and imported into Design Space, and I cut it on some Adhesive Foil. One of my favorite things about using the Cricut, is that I can easily upload new fonts and images RIGHT into Design Space so I'm not limited to only what is available in my library. You can also purchase Cricut Access which gives you a WEALTH of fonts and images right at your fingertips!
Pro-tip: Make sure you use an alcohol swab or wipe to clean the outside of the glass, then allow it to fully dry before applying the adhesive foil. This ensures proper adhesion and a long lasting product!
She LOVES her new brush holder!
Speaking of Wunkie...
She's so cute, right?! I also made her this cute long sleeve shirt to wear for the holidays! Super easy to do, and she loves cookies so the design just made her day! I used Cricut Glitter Iron on in Gold. To see a trick on how I ensure that my designs are centered while applying HTV vinyl, check out my video on my Instagram. Again, super easy to make on the Cricut Air2! Just remember to mirror your image in Design Space right before you cut! I speak from experience!
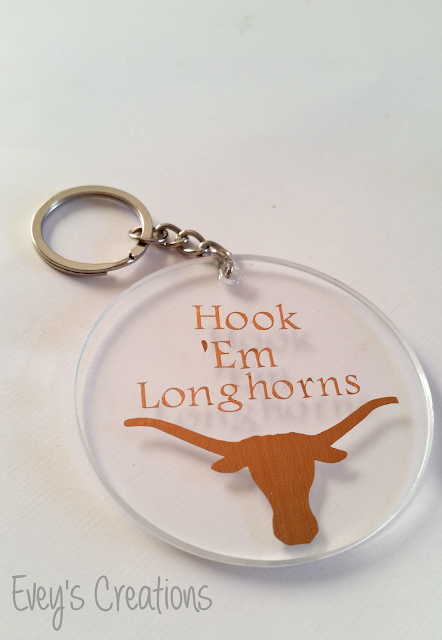
Here's another idea! I stumbled across a 'Blanks' group on FB one day and found a community of folks who create incredible designs on 'acrylic blanks'. Everything from ornaments to keychains! I figured I'd order some keychain blanks to make some gifts, and I gave it a try with the above design. Clearly I need to hone on my skill as some of the lettering is a bit shifted but I love my Longhorns keychain! I've seen people do awesome stuff like glitter the back and monogram the front to name a couple. I have about 20 more blanks so I can keep practicing and make some for my family! Weeding the tiny lettering was likely the toughest part of this project, but only because I have a hard time due to my RA. I'm sure it will get easier with time!
Hope you enjoyed my ideas for some easy DIY Holiday gifts just in time for the holidays! I know I had a BLAST creating them! Please feel free to leave any questions in the comments and I will answer them to the best of my ability!
Tomorrow I'll be sharing my Holiday Gift Guide with a GREEN twist, so stay tuned for that! For those that celebrate Thanksgiving, HAPPY COOKING! I'll be in the kitchen baking some pies the rest of today!


No comments:
Post a Comment
Hello! I LOVE comments! I try to get back to each one individually, especially when it's a question! If for whatever reason I don't, please always feel free to email me your questions and I will always write back!