Showing posts with label Tutorials. Show all posts

Sunday, September 9, 2018

Pumpkin Spice Lattes and Fall Sign Tutorial


Hey y'all! Who loves Fall? I DO! It's actually my favorite time of the year. Here's a fun fall-inspired sign and if you are still with me at the end, I'll maybe even have the free file for you! ;)

My bloggy buddies and I have once again joined forces to bring you 14 Home Decor Projects, I figured I'd kick off Fall with my project, but make sure you check out all of the other awesome ones for more project inspiration. The projects are listed at the bottom of my post, just click on each name and it will take you to each blog!
 
Since it's officially Pumpkin Spice Latte season, I thought I'd share this fun tutorial!

**Though I was compensated for this post in product and/or monetarily, all opinions, ideas and comments are 100% my own. Please note: this post may also contain affiliate links.**


I actually designed this sign a few years back for a Home Show Make it Take it Workshop, but I thought I'd share the project supplies list and file (free!) with you guys now!

For this project you will need the following:
First, sand, clean and stain your board and allow it to fully dry. Once it's dry, hit it with some of the spray lacquer listed above. To make a stencil, simply cut out your vinyl and instead of removing the background when you weed it, remove the letters, leaving the background and making sure to leave the letter centers. Use some transfer tape to transfer your stencil onto your board. Make sure to burnish your stencil before adding your paint so as to not get any bleed through. To get the ombre look, just pour out some paint/stain onto your palette in an ombre look and drag your foam brush straight across it to get the effect. Make sure to remove your stencil while the paint is still partially wet so as to not lift it.

Alternatively, you can stain or paint the board and use vinyl for the lettering like these gals did at the Home Show:


Either method looks great! Just make sure if you're going the colorful board and vinyl route, that you seal your Unicorn SPiT before adding your letters. You can do this by giving a quick spray with the lacquer I listed above, making sure it's fully dry before adding the letters using transfer tape or it might lift up your stain or paint. I personally love both looks but went for the stained board in a dark walnut, then lacquer, then the stencil and paint.


As promised, here's the file in jpg format...just right click, save to your drive, then open up Design Space and upload it. You can find a video and post on how to import your own designs into DS HERE.

Tell me, have you had a Pumpkin Spice Latte this season already? I will let in on a little secret...I don't drink coffee! I KNOW! IT'S CRAZY, BUT I DON'T! I'm a Tea girl. Tea is life. ;)

Don't forget to check out the other 13 posts and visit my bloggy friends.
Here's that list:


Happy Fall, y'all!

  Image HTML map generator


Saturday, July 22, 2017

Embossed Favor Bag tutorial with the Cricut Cuttlebug!

**Though I was compensated for this post in product and/or monetarily, all opinions, ideas and comments are 100% my own. Please note: this post may also contain affiliate links.**

Hi, yall! I'm SO excited to begin sharing some of the projects from the wedding I worked on last month!

The first one I'm sharing was created using my amazing, brand new, mint-colored Cricut Cuttlebug which retails for $89.99. Make sure you take full advantage of the current deal going on over on the Cricut website! 30% off mats, blades and tools (valid until 7/5 only)!

Also, if you use the code CHRISTMASINJULY at checkout, you will receive free shipping within the U.S. (valid until 8/1).


The Cuttlebug is an adorably cute, compact die cut and embossing (manual) machine by Cricut. Just like the Air2, it comes in various colors to match.

Check out the sweet embossed favor bags I created for the reception! They held beautifully hand piped cookies by my incredible friend, Dawn. Thank you Dawn! I LOVE YOU!


Here, via FB live, is how I made them! Honestly, I made a ton in just a show amount of time. The Cuttlebug made it a very easy, quick and fun experience. My daughter helped me, of course!


You can see all of the embossing folders that Cricut has for sale, here.

I'm excited to add some more to my collection, especially the holiday and birthday ones for card making.

Hope you enjoyed the tutorial! Be sure to share you Cricut projects on Social Media, using the hashtag #cricutmade. Until next time!

  Image HTML map generator
This is a sponsored conversation written by me on behalf of Cricut. The opinions and text are all mine.


Wednesday, November 23, 2016

How to make Custom Holiday Gifts for your loved ones using the Cricut Air2!


Hi Y'all!

IT'S THE MOST WONDERFUL TIME OF THE YEAR!

Sorry, I needed to get that out. Christmas is my favorite holiday and I'm just so excited to officially get into the holiday spirit!

**Though I was compensated for this post in product and/or monetarily, all opinions, ideas and comments are 100% my own. Please note: this post may also contain affiliate links.**

 Y'all. I know you have seen me go crazy for my new Cricut ALL over Instagram and FB. I just can't help it. I am loving having the ability to make whatever my imagination comes up with!

(Affiliate)
 Since it's almost Black Friday, Cricut is having a sale, up to 40% and that's only their Early Black Friday Sale! Stay tuned to their website to see what else goes live on Black Friday itself!

Here are some of the gifts I made with MY Cricut Air 2. They're SO easy to make, and so unbelievably cute!


 My Wunkie princess (that's my daughter's nickname if you're new to these parts), just LOVES art and painting. She is quite the budding artist. I post her sketches and paintings quite often on Insta so you will have to go check them out there! If you have been on my corner of the internet before, you may know that her room is purple and teal! She needed a special place to hold all of her artists brushes so I decided to make her a brush holder!


All you need to do this is a Dollar Tree votive holder, some Darice Fine Glitter in Purple and Luminous, some Mod Podge. and your favorite quote! I used a Van Gogh quote since Wunkie loves his work. It reads, "Art brings imagination to life."

Using a brush, Mod Podge the inside of the votive holder, then quickly add the glitter, turning the glass so it evenly coats all of the cup. To do two colors, you must coat each layer separately and wait until the first layer is dry to apply the second one. Some people actually use a glaze coat inside once it's glittered and dry but I just sealed the glitter with a spray lacquer.

For the quote, I used a font that I bought and imported into Design Space, and I cut it on some Adhesive Foil. One of my favorite things about using the Cricut, is that I can easily upload new fonts and images RIGHT into Design Space so I'm not limited to only what is available in my library. You can also purchase Cricut Access which gives you a WEALTH of fonts and images right at your fingertips!

Pro-tip: Make sure you use an alcohol swab or wipe to clean the outside of the glass, then allow it to fully dry before applying the adhesive foil. This ensures proper adhesion and a long lasting product! 

She LOVES her new brush holder!

Speaking of Wunkie...


She's so cute, right?! I also made her this cute long sleeve shirt to wear for the holidays! Super easy to do, and she loves cookies so the design just made her day! I used Cricut Glitter Iron on in Gold. To see a trick on how I ensure that my designs are centered while applying HTV vinyl, check out my video on my Instagram. Again, super easy to make on the Cricut Air2! Just remember to mirror your image in Design Space right before you cut! I speak from experience!


Here's another idea! I stumbled across a 'Blanks' group on FB one day and found a community of folks who create incredible designs on 'acrylic blanks'. Everything from ornaments to keychains! I figured I'd order some keychain blanks to make some gifts, and I gave it a try with the above design. Clearly I need to hone on my skill as some of the lettering is a bit shifted but I love my Longhorns keychain! I've seen people do awesome stuff like glitter the back and monogram the front to name a couple. I have about 20 more blanks so I can keep practicing and make some for my family! Weeding the tiny lettering was likely the toughest part of this project, but only because I have a hard time due to my RA. I'm sure it will get easier with time!

Hope you enjoyed my ideas for some easy DIY Holiday gifts just in time for the holidays! I know I had a BLAST creating them! Please feel free to leave any questions in the comments and I will answer them to the best of my ability!

Tomorrow I'll be sharing my Holiday Gift Guide with a GREEN twist, so stay tuned for that! For those that celebrate Thanksgiving, HAPPY COOKING! I'll be in the kitchen baking some pies the rest of today!

  Image HTML map generator

This is a sponsored conversation written by me on behalf of Cricut. The opinions and text are all mine.

Wednesday, April 13, 2016

Heart String Art Tutorial (with video)

**Though this post contains sponsored content for which I was compensated monetarily and/or in product, all ideas, opinions and thoughts are 100% my own. This post may also contain affiliate links.**


Hi y'all!

I'm back for another CeCe Brand Rep Project! I truly love these products and if you follow along via social or any of the Facebook paint and DIY groups I belong to, you may have seen some snippets of this project back in February around Valentine's Day. I had the honor of hosting a workshop with a version of this project for the Make it Take it Station at the Philly Home Show.

Here's what you will need for this cute artwork project:


Supply List:

- A decent and heavy enough (but not so heavy that you can't properly handle it) hammer
- Scrapwood or a pine board cut to about 12x12 size
- Foam brush
- Twine or String
- 1/4 in. Wire Nails
- Sanding Sponge
- CeCe Caldwell's Stain+Finish in Beechnut Gray

Instructions:

Sand your board with your sanding sponge in order to remove the factory finish on it. Apply the Stain+Finish with the foam brush, always staining in the direction of the wood grain, never against it. You don't want to overload your brush, offload onto a paper towel if you think you have too much. Apply one coat for a slight weathered wood look, two coats for a deeper gray stain. Wait in between coats for stain to fully dry.

Next using a template that is taped down to your board, score the wood by taking one nail and lightly hitting it with the hammer to make one indent into the wood at a time, about 1/2 inch apart all the way around.I simply created a heart template using clipart in Word and fit it to the full page (8 1/2"x11") then printed it out. Once your board is scored, hammer a nail into each indent. Make sure to hit the nailhead dead on, and straight down about halfway into the board.

Once all your nails are in, begin to string. Tie off the string with a double know at your starting point. To create an outline you must go around each nail following your shape. Then you can string in a diagonal manner or in whichever way you decide to.

You can see how I did this in the video below.


For the record, the top of the buffet that my string art is sitting on was also done in CeCe's Stain+Finish! I used my two favorite colors for the top of that piece, Kukui and Walnut Grove!

Thanks for stopping by! See you soon with more crafty fun!

Image HTML map generator

Monday, November 16, 2015

10 Tips to Decoupaging the Perfect Image onto Furniture


Ever wonder how to perfectly decoupage a piece of furniture? Well, you've come to the right place, grab your favorite decoupage medium and and your favorite foam brush. Here are 10 tips to Decoupaging the Perfect Image onto Furniture.


10. $5 posters from your favorite big box store are perfect for decoupaging.
9.  Line up your image where you want to decoupage it and cut with sharp scissors neatly around it to fit the area.
8. To ensure a perfect cut, especially if there are drawers or doors, use painter's tape to temporarily adhere your image to the area where you will be decoupaging and measure the spaces carefully.
7. Use a ruler and pencil make light marks where you will cut the image to allot for openings.


7. The best tool for cutting at this point, is a craft or precision cutter; do so on a cutting mat, using the ruler to make sure you have straight and perfect cuts. 
6. It's time to decoupage! Start by adding some decoupage medium to the drawer, as well as to the back of your image and makes sure you are using a foam brush.
5. It's imperative that you have a tool to smooth out any air bubbles, once you place your image down. I like to use a credit card or you can buy a roller tool meant just for this purpose.
4. The most important thing at this point is to remember to allow the decoupage medium to FULLY dry before moving on.
5. You can now add a top layer of decoupage medium. I like to wet my foam brush a bit after I dip it in the medium. Do not add too much water or you WILL get wrinkles.
4. Once again, it's very important to wait until each layer or decoupage medium is FULLY dry before proceeding onto the next layer.
3. To make sure you have a good seal, add a full 3 layers of decoupage medium over the image.
2. Make sure to seal your surface if this will be a 'high traffic' piece. Use something that won't reactivate the water based adhesive or, you guessed it, you will get wrinkles.
1. My last and most important tip is to HAVE FUN!


Please check out the full tutorial post on my blog, HERE.


Image HTML map generator

Thursday, June 11, 2015

5 uses for your heat gun

**Though I received product and compensation for this post, all opinions and ideas are 100% mine unless otherwise stated. This post may also contain affiliate links. Should you use the link to purchase product, I will receive a tiny percentage of it! :) **


Hi y'all! HomeRight is always good to me, as you know, and we've given away so many heat guns and sprayers, I thought I'd draft a post on how they can be used! (Heat Guns, that is.)

Friday, March 13, 2015

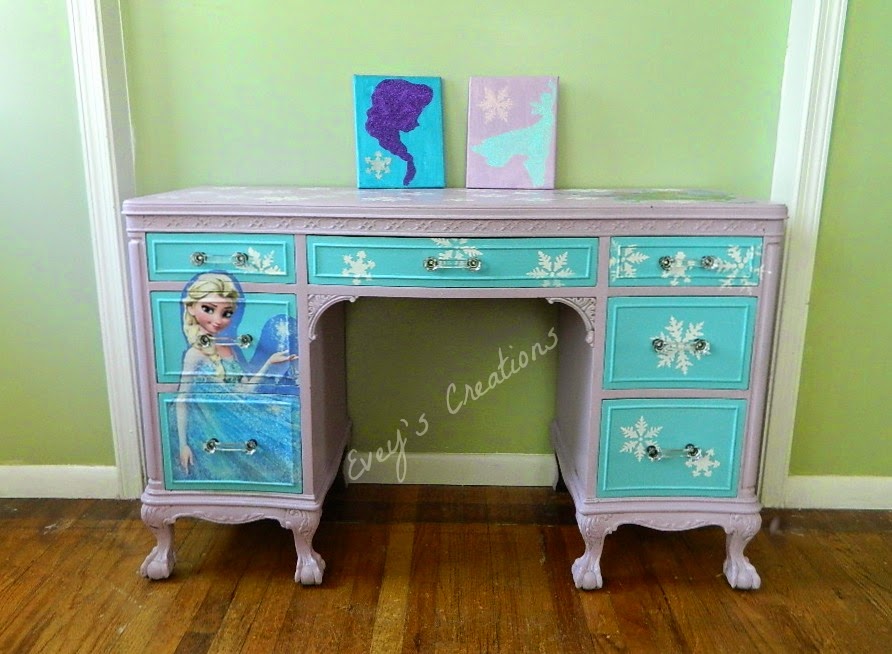
Frozen-Inspired Vanity Redo/Decoupage Tutorial

**This post contains sponsored content. Please see full disclosure at end**

Hi, y'all! HERE SHE IS! I've been showing you tiny sneak peeks on Instagram and Facebook, but here she is in all her glory! My daughter's vintage vanity, all "Frozen'd" up! What do you think!? She loves it! (HINT, HINT, THERE IS A GIVEAWAY AT THE END OF THIS POST!)

Tuesday, January 13, 2015

A pretty blue girl...Vintage Sideboard Redo


Hey y'all! HAPPY NEW YEAR! I truly hope you enjoyed your time with your loved ones this holiday season! Congratulations to all of you winners for our 12 days of Christmas giveaways and THANK YOU to all you amazing vendors that participated!

Today I wanted to bring you a tutorial on this lovely beauty I restored and refinished for a client just in time for Christmas! Her story is a good one!

Here's what she looked like before:


Though she was still lovely, she was a hot mess! You can't tell from the pictures, she had some structural issues that needed to be addressed.

For starters, part of the right leg was missing the back part of that last spindle. Also, the veneer had seen better days and was starting to lift and warp on the top and one of the sides.

Here's where it gets tricky.  Since my workshop is very dark in the winter, and it's too close for me to open up the garage door, I don't have step by step photos like usual for this tutorial, but bear with me.  I promise to explain it in full detail.

First, I removed the veneer from the top using a damp towel and blow dryer. I hope to be getting a heat gun soon but in the meantime this is my trick! I get a towel damp and leave it on the top of the veneer I want to remove for  a few hours. Then I finish the job using a blow dryer on high heat and the veneer peels right off!

You can replace the veneer for the sides but it's not necessary. Veneer can be purchased at most big box home improvement stores and local lumber yards. Make sure you clamp well and use a good quality wood glue when replacing veneer.

Time for a pretty picture to break up all of these words...

 Sigh...isn't she dreamy!? Please note, the slight yet perfect distressing? She's gorgeous!

Back to the tutorial. :)

Next I replaced that missing spindle! Want to know just how easy it is to do this!? It's as easy as buying some Mold Builder Liquid Latex Rubber 16oz/473ml or silicone molding materials from Amazon!*

I prepared the molding compound according to the instructions on the packaging then pressed it to the other side's spindle, wrapping it around and fully pressing down to allow all the detail to be imprinted in the silicone. I let it cure as per the product's indications. Once it was ready to use as a mold, I began the layering process with wood putty or Bondo. I let each layer dry fully before adding more until it was complete. You never want to fill it right away when it's such a thick spindle, but for small trim or detail it would be fine! I used some wood glue and more clamps to hold it in place once it was dry and popped out of it's mold! :)


I then gave this beauty a custom color using the following formula of Annie Sloan Colors:

3 parts Aubusson Blue, 3 parts Chateau Grey, and 1 part Old White.

This color matched some textiles in the room where this sweet piece will live out her days.

I decided to surprise my client and paint the inside of the buffet in Chateau Grey for a special two tone look when you open up the door!


The best part about this doing piece was that it was a sentimental piece. Most of you that know me, know that there are pieces I WON'T paint, but I told my client that if she wasn't going to be selling this piece, due to the personal story attached to it, I would go along with painting it. I have to tell you that I am SUPER pleased with the result and I would paint this baby again in a heat beat! :) My client extremely happy and that is ultimately ALL that matters to me!

 Isn't she LOVELY?

***Update! Someone pointed out that I forgot to add what she was sealed in! I used General Finishes' High Performance Top Coat in Satin. Three coats of it.****
Image HTML map generator

*This post contains Affiliate Links. For more info, check out our full disclosure at the bottom of our blog!

Thursday, December 4, 2014

Vintage Window into Holiday Command Center


Hi y'all!

This awesome Crafty hangout video is brought to you today by Adtech Adhesives**. THANK YOU ADTECH! They are truly awesome sponsors and I really loved doing this project. I've had several vintage windows in my shed for awhile. I turned a few of them into chalkboards and used one for a photo shoot, but I really wanted to make one of them into a command center to give as a Christmas gift.  When I saw the awesome dot tape runner in my fabulous box of goodies from Adtech, I knew JUST what to do with it!

Check out this video for my tutorial, then head over to craftyhangouts.com for MORE awesome videos using Adtech products as well as this month's sponsors!


Here are some pictures of the finished product!


Instead of putting chicken wire in it like I had planned, I cut a piece of foam board to fit very snugly inside of the panel. Before placing it in, I painted it with chalkboard paint.  It required about 3 coats for it to be even and completely black. I let it dry overnight and cured it once it was completely dry. To cure it, I simply lightly shaded the entire surface with some chalk and let it sit that way for 24hrs according to the instructions on the paint can. Then, I just popped it in.


I ordered a poster size piece of cork board online and cut it the pieces to fit the panels as well.
The paper behind the glass is firmly secured but may be swapped out for different seasons. Instead of a Christmas bow on the top, you can hot glue something less holiday inspired and use it year round. Doesn't this just make a wonderful DIY gift for a sweet friend?!


xo,

Evey
Owner/Creator, Evey's Creations

Tel: 201-281-6696 
http://sweetsongbird.eveyscreations.com
FB: www.facebook.com/EveysCreations
G+: https://plus.google.com/u/0/105370121686355288267/posts
Twitter: @EveysCreations
Instagram: @EveysCreations
Hometalk: http://www.hometalk.com/eveya
logo  

**Though this post was sponsored, and I did receive compensation, as well as products, ALL opinions and ideas expressed are 100% mine. :)

Wednesday, May 29, 2013

Captain Underpants: Lego game inventor


For those of you in the know, my oldest (aka Captain Underpants) has a sincere desire to become a Lego Master Builder. There really is such a job, just take a look at the life-size replica of Luke Skywalker's speeder that was just unveiled in Times Square.  Needless to say, I am definitely encouraging this as a job choice. He would basically get to be an engineer that plays for a living. Smart kid; at age 9 1/2 he has figured out how to play with toys and get paid to do it.
Recently, in the Captain's math class, the kids have been tasked with creating a board game. They have to come up with a game board, rules, playing pieces, etc. This has gotten the Captain all excited about games.  Of course, his project is highly detailed, but at home he keeps coming up with games, "just for fun, Mom" that he tries to entice us to play.
Today, while I was enjoying myself immensely by rearranging my boards on Pinterest, the Captain asked me if I had come up with any cool ideas that I could put on Pinterest myself.  When I mentioned that my main involvement with Pinterest has basically involved finding other people's cool ideas and then making them myself, the Captain shook his head and announced that he would come up with something that I could pin.  Clearly the child wants me to make a contribution of some kind instead of just poaching the good ideas of others. Go figure. To help me out, the Captain invented a quick Lego game and demonstrated it for me so that I could pass it on to you.
I will give you the instructions word-for-word as he wrote them down for me, as he has such a way of putting things...I have no hope of replicating it.
5 minutes. 30 pieces. (Variable time and number of pieces)
1. Pick 30 random Lego pieces
2. Set timer for 5 minutes
3. Start the timer, start building, and have fun!"
Then he drew a little box that said "picture...final" that was supposed to represent me adding in a picture of his final creation.  He also created the caption for the picture. Hilarious.
This is a stripped down version of the game Creationary, where you get two minutes to build a specific object out of Legos and your teammates have to guess what it is.  But, the difference here is that you have a limited number and limited time to create ANYTHING.

Thursday, April 25, 2013

DIY Diaper Cakes


Hi y'all!  Today I wanted to share some of the diaper cakes I've made with you!  Making a diaper cake is very easy to do, and it's a really cute way to give an expectant mother something that she can actually USE! 

Materials:

1 bag of size 1 diapers (Make sure they are not the colorful kind)
Ric Rac Trim
Ribbon
Fabric/Felt Scraps
Pins
9in Cake Circle
Baker's Twine
Baby Items (socks, burp clothes, pacifiers,
Empty Paper Towel Roll
Empty Toilet Paper Roll


I've received diaper cakes with tons of tape holding them together, which rendered the diapers useless.  I wanted to make sure that didn't happen to the recipients of these cakes!  I hot glued the paper towel roll and toilet paper roll to the cake round.  I then laid the diapers on their side, almost fanning them out around the roll, creating a circle.  Instead of taping them together, I tied them together with a piece of Baker's Twine. 

 I used the ric rac to resemble frosting. I also made some flowers and rosettes with the scraps of fabric and felt, then pinned them to the diaper cake for some decoration.

This diaper cake was gender neutral as my client's family member was waiting until the birth to find out the sex of the baby!  I used the burp clothes as if they were fondant and completely covered the middle tier with it.  

To finish them off, I used the ribbon and pinned it in place, then added the stuffed animals and pacifiers at the top, securing them with more pins and some Baker's Twine.  I will be making three more of these in the coming weeks!  They are so much fun to make!  I hope I have inspired you today!

xoxo

Evey
Owner/Creator, Evey's Creations

Tel: 201-281-6696 
http://sweetsongbird.eveyscreations.com
FB: www.facebook.com/EveysCreations
G+: https://plus.google.com/u/0/105370121686355288267/posts
Twitter: @EveysCreations
Instagram: @EveysCreations
Hometalk: http://www.hometalk.com/eveya
logo  

Follow Evey!

My Favorite things!

All content owned and created by

Evelin Alvarez-Flores

2009 © 2020


blog design by:
HTML Map