
**This post contains sponsored content. Though I was compensated monetarily and/or with product, all ideas and opinions are 100% my own!**
Hey y'all!
You guys know how I feel about my HomeRight Finish Max Pro. (**Update: I now have the Finish Max as my Pro finally bit the dust since I used it so often and had it for so long! I'm loving the Finish Max, as well!!!!**) This compact baby packs a powerful punch! I spray everything from true milk paints, to acrylic based paints (both chalky finish and not), even mineral based paints! How, you ask!? Well, my friends, you have come to the right place!

Here is how to properly dilute and prep many different types of paint in order to spray them!
1. My favorite type of paint, and perhaps the easiest to spray is good Old Fashioned Milk Paint. (Yes, that is the brand I use, but this works for all types of milk paints, as long as they're the real deal.)
When you are spraying a true milk paint without the bonding agent, all you need to do is make it a tiny bit runnier than you usually do when mixing. Instead of mixing equal parts water (distilled or bottled works best) and milk paint powder, add a tiny bit more water than powder. I would calculate it to be one part powder to one and a quarter part water. Test with your viscosity cup and consult with your sprayer's manual to ensure that the paint is running through it accordingly. For the HomeRight Sprayer, I've found the optimum run-out time to be somewhere around 30 seconds.
If you are going to be adding your bonding agent for the non-chippy look, all of the above changes. The acrylic bonding agent is mixed in after the paint is mixed. It is usually equal parts bonding agent to equal parts mixed milk paint. This means the paint now acts a lot like acrylic paint. Therefore, it needs to be thinned out the same way an acrylic paint would be thinned out.
Which brings me to my next point:
2. Acrylic Paint: Here's the thing, when it comes to acrylic paint, you have quite a few options.
For thinning out the TRUE milk paint with added acrylic binder, you need to add some acrylic extender into the mix. I have found my formula (again, I use OFMP, as well as their Extra-Bond) to be 1 part MIXED paint WITH acrylic binder to a little under a 1/2 part Acrylic Extender. You want the viscocity cup run-out time to be somewhere around 25-30 seconds. Any thicker and you will have a gooey mess.
For thinning out Chalky Finish Acrylic paints, (such as DecoArt's Americana Decor line) you will also need to use an acrylic extender. Some people will tell you to use water since technically the paints are water based and with an acrylic (polymer) binder, but please bear with me because I'm about to get really nerdy on you. ::smile::
An acrylic extender does just what it says, extends. It extends the drying time, thins, and when you are using it with a brush, it reduces brush strokes. While water will, for the most part, work fine, I prefer using the extender because it works 100% percent of the time. Your paint won't seize up on you, and you will have a better working time, which equals a nice and clog-free paint sprayer nozzle. Why? That's simple, it's chemistry. The emollient and humectant in the extender work together to keep your paint (yup, you guessed it) smooth and wet. This comes in extra handy when you add air and a spray nozzle. Keep in mind, this also extends your drying time, but not having to brush the paint on your piece, is totally worth it!
Here's a secret: this is the same way I thin out ASCP. I won't get into details, but believe me when I tell you it works.
You want the run-out time to be somewhere around 35 seconds.
For Non-Chalky Finish Acrylic (Traditional) Paints, such as General Finishes, also use an acrylic extender. You won't need to add as much though, as they are general smoother than their chalky finish counterparts.
Now on to another set of polymers:
3. Latex and Enamel paint: Again, you can use plain old water, but it won't always work out the way it should. I like to use both water AND (sometimes OR) a flow medium like Floetrol to thin out latex paint. Keep in mind, many 'latex' paints on the market are not 'latex' at all, but rather enamel or acrylic, make sure you know the difference. Latex and enamel paint usually requires around 10% thinning in order to be sprayable. The viscosity run-out time should be similar to an acrylic, on average around 35 seconds. I use around four parts water to one part Floetrol for my latex or enamel paint. Keep in mind, you only need to thin it out around 10%. Yes, I'm forcing you to do math.
4. Mineral, Water-based paints: A true mineral paint, that contains no polymers, (such as CeCe Caldwell's Chalk+Clay Paints) only needs water to thin it out. I hardly spray this type of paint, but have done so successfully.
You need a run-out time of around 40 seconds for it to truly flow out properly and not clog your nozzle. Add water until you see that happen with your viscosity cup. Don't add too much though, or you will have adherence issues.
5. Stains and Topcoats: To spray traditional oil or water based stains (NOT Gel Stains), you don't need to do any thinning. Just have at it. The same goes for a Polycrylic or a Polyeurethane...just spray away. For an oil-based VARNISH, though, you WILL have to thin. I usually use mineral spirits, but you can also use Turpentine. Follow the instructions on your sprayer and using your viscosity cup, thin accordingly. For the HomeRight Finish Max Pro, this will mean thinning out to an average run-out time of around 35 seconds (20-45 seconds).
Last thoughts, please make sure you STIR your thinners and solvents into your paint and stain, and do not shake the cans, so as to prevent air bubbles when spraying. Also, you might want to strain your old paint or stain in order to prevent any clumps from making their way into your spray nozzle.
I hope this helped you guys! As always, thanks for checking us out! If you have any questions, leave them in the comments section and I will try to answer them to the best of my ability!

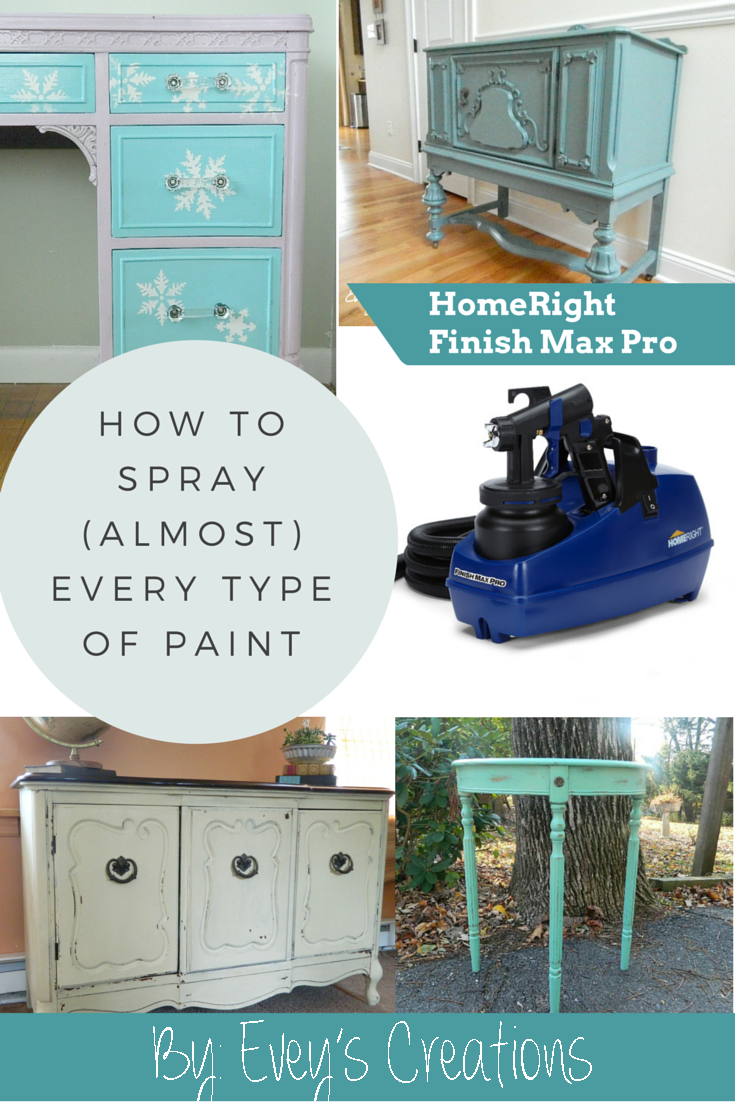
Hey y'all!
You guys know how I feel about my HomeRight Finish Max Pro. (**Update: I now have the Finish Max as my Pro finally bit the dust since I used it so often and had it for so long! I'm loving the Finish Max, as well!!!!**) This compact baby packs a powerful punch! I spray everything from true milk paints, to acrylic based paints (both chalky finish and not), even mineral based paints! How, you ask!? Well, my friends, you have come to the right place!
Here is how to properly dilute and prep many different types of paint in order to spray them!
1. My favorite type of paint, and perhaps the easiest to spray is good Old Fashioned Milk Paint. (Yes, that is the brand I use, but this works for all types of milk paints, as long as they're the real deal.)
 |
| Shabby Chic Storage: A Milk Painted Buffet |
If you are going to be adding your bonding agent for the non-chippy look, all of the above changes. The acrylic bonding agent is mixed in after the paint is mixed. It is usually equal parts bonding agent to equal parts mixed milk paint. This means the paint now acts a lot like acrylic paint. Therefore, it needs to be thinned out the same way an acrylic paint would be thinned out.
Which brings me to my next point:
 |
| Frozen-Inspired Vanity |
2. Acrylic Paint: Here's the thing, when it comes to acrylic paint, you have quite a few options.
For thinning out the TRUE milk paint with added acrylic binder, you need to add some acrylic extender into the mix. I have found my formula (again, I use OFMP, as well as their Extra-Bond) to be 1 part MIXED paint WITH acrylic binder to a little under a 1/2 part Acrylic Extender. You want the viscocity cup run-out time to be somewhere around 25-30 seconds. Any thicker and you will have a gooey mess.
For thinning out Chalky Finish Acrylic paints, (such as DecoArt's Americana Decor line) you will also need to use an acrylic extender. Some people will tell you to use water since technically the paints are water based and with an acrylic (polymer) binder, but please bear with me because I'm about to get really nerdy on you. ::smile::
An acrylic extender does just what it says, extends. It extends the drying time, thins, and when you are using it with a brush, it reduces brush strokes. While water will, for the most part, work fine, I prefer using the extender because it works 100% percent of the time. Your paint won't seize up on you, and you will have a better working time, which equals a nice and clog-free paint sprayer nozzle. Why? That's simple, it's chemistry. The emollient and humectant in the extender work together to keep your paint (yup, you guessed it) smooth and wet. This comes in extra handy when you add air and a spray nozzle. Keep in mind, this also extends your drying time, but not having to brush the paint on your piece, is totally worth it!
Here's a secret: this is the same way I thin out ASCP. I won't get into details, but believe me when I tell you it works.
You want the run-out time to be somewhere around 35 seconds.
 |
| Painted in a General Finishes Custom Color Blend |
For Non-Chalky Finish Acrylic (Traditional) Paints, such as General Finishes, also use an acrylic extender. You won't need to add as much though, as they are general smoother than their chalky finish counterparts.
Now on to another set of polymers:
3. Latex and Enamel paint: Again, you can use plain old water, but it won't always work out the way it should. I like to use both water AND (sometimes OR) a flow medium like Floetrol to thin out latex paint. Keep in mind, many 'latex' paints on the market are not 'latex' at all, but rather enamel or acrylic, make sure you know the difference. Latex and enamel paint usually requires around 10% thinning in order to be sprayable. The viscosity run-out time should be similar to an acrylic, on average around 35 seconds. I use around four parts water to one part Floetrol for my latex or enamel paint. Keep in mind, you only need to thin it out around 10%. Yes, I'm forcing you to do math.
4. Mineral, Water-based paints: A true mineral paint, that contains no polymers, (such as CeCe Caldwell's Chalk+Clay Paints) only needs water to thin it out. I hardly spray this type of paint, but have done so successfully.
 | ||
| Done in Custom Color Blend with CeCe Caldwell's Paints |
You need a run-out time of around 40 seconds for it to truly flow out properly and not clog your nozzle. Add water until you see that happen with your viscosity cup. Don't add too much though, or you will have adherence issues.
5. Stains and Topcoats: To spray traditional oil or water based stains (NOT Gel Stains), you don't need to do any thinning. Just have at it. The same goes for a Polycrylic or a Polyeurethane...just spray away. For an oil-based VARNISH, though, you WILL have to thin. I usually use mineral spirits, but you can also use Turpentine. Follow the instructions on your sprayer and using your viscosity cup, thin accordingly. For the HomeRight Finish Max Pro, this will mean thinning out to an average run-out time of around 35 seconds (20-45 seconds).
Last thoughts, please make sure you STIR your thinners and solvents into your paint and stain, and do not shake the cans, so as to prevent air bubbles when spraying. Also, you might want to strain your old paint or stain in order to prevent any clumps from making their way into your spray nozzle.
I hope this helped you guys! As always, thanks for checking us out! If you have any questions, leave them in the comments section and I will try to answer them to the best of my ability!


